How to Use Help Scout's API to Build Custom Integrations
Welcome to our guide on using Help Scout's API to create custom integrations. Extend Help Scout's capabilities and automate processes. In this guide, we'll walk you through using the API to build tailored solutions that enhance your workflow.
1
Set up a Help Scout account and API Key
1
Log in to your Help Scout account.
To begin, open your web browser and navigate to the official Help Scout website at www.helpscout.com. Look for the "Login" button, usually found in the top right corner of the webpage. Click on it and enter your credentials (username and password) in the respective fields, then click "Sign In" to log in to your account.
2
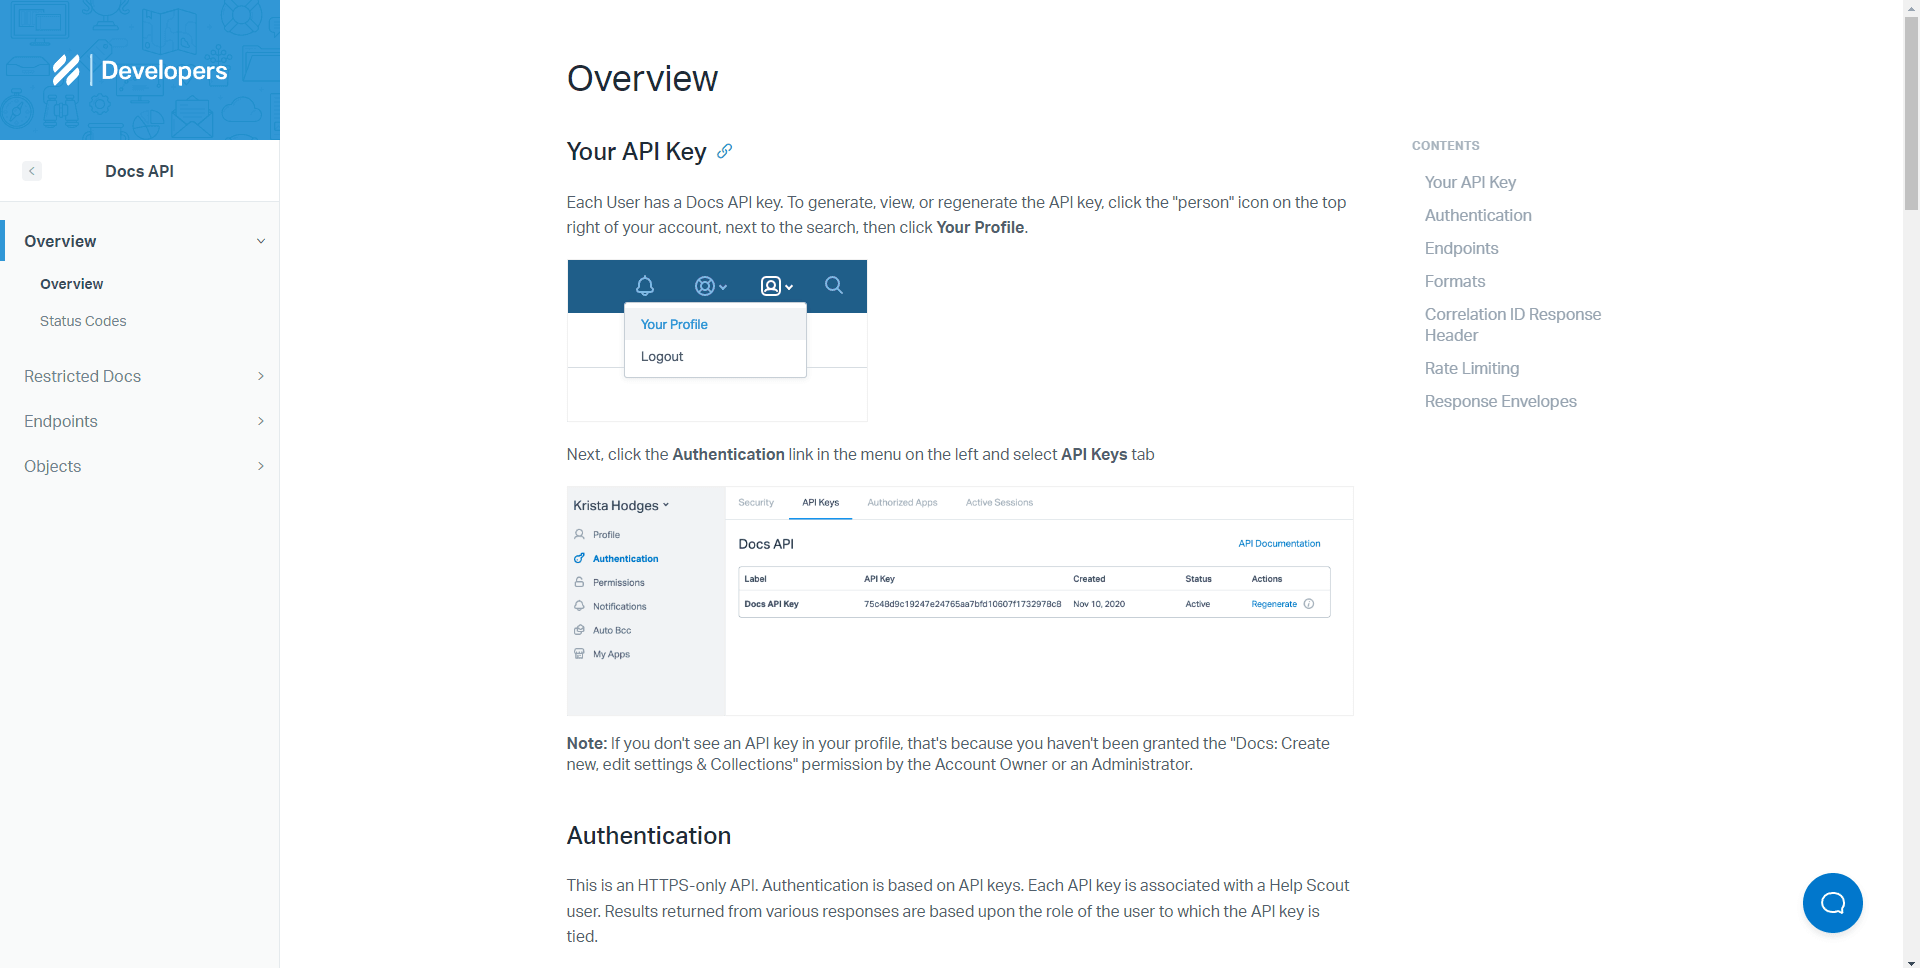
Navigate to your profile by clicking on your avatar in the top-right corner.
Once logged in, locate your avatar or profile picture, which should be positioned in the upper-right corner of the screen. This icon usually resembles a small circular image. Click on this avatar to reveal a drop-down menu.
3
Click on the "My Profile”.
In the drop-down menu that appears when you click on your avatar, find and select the option that says "My Profile". This will take you to a page that displays your personal information, including your name, email address, and other account details.
4
Click the "Authentication" button in the right side.
On your profile page, look towards the right side for a button or tab labeled "Authentication". It's usually part of a group of options related to account settings. Click on this button to navigate to the authentication settings for your account.
5
Click “API Keys” beside the Security on the top.
Within the Authentication page, look for a tab or button labeled "API Keys". It's generally located near the top of the page, beside or under a section titled "Security". Clicking on this will direct you to the section where you can manage your API keys.
6
Your API key will be displayed on the next screen. Save it securely, as you will need it for your custom integration. You can generate another API key.
In the "API Keys" section, you'll see a display of your current API key or keys. You may also have the option to generate a new one if needed. This is a sensitive piece of information used for linking and data exchange with other services, so be sure to store it securely. Remember to click "Save" or a similar button if you generate a new key, to ensure the changes are applied.
2
Familiarize yourself with the Help Scout API documentation

1
Visit the Help Scout API documentation
To perform this step, simply open your web browser and enter the provided URL https://developer.helpscout.com/docs-api/) into the address bar. You'll be taken to the main page of the Help Scout API documentation.
2
Get an overview of the available endpoints, such as Conversations, Customers, Mailboxes, and Users.
The overview of available endpoints is usually listed in a table of contents or a similar section in the API documentation. You should look for terms like "Conversations", "Customers", "Mailboxes", and "Users" – these represent different sets of functionalities or data that the API provides. Clicking on these terms will likely take you to a detailed explanation of the operations that you can perform related to each term.
3
Make note of the request and response format, authentication, and pagination.
The request and response format will typically be shown in the detailed documentation for each endpoint. It will include the type of request (GET, POST, DELETE, PUT, etc.), the URL for the request, and any required or optional parameters. The response format will be the structure of the data that the API returns.
Authentication information will likely be found in an introductory or overview section of the documentation. This section will provide information about how to authenticate your requests to the API, often involving an API key or OAuth.
Pagination is a way to control how much data you receive from an API at once. If the API returns a lot of data, it may split it into 'pages'. You usually can control pagination through parameters in your request. Look for information about these parameters in the same place where request and response formats are defined.
Remember, the exact layout and organization of the API documentation may vary, but most will contain these elements. If you have trouble finding information, look for a search function or a table of contents to guide you. Also, don't hesitate to reach out to the API provider's support if you need assistance.
3
Choose your programming language and preferred API client
1
Determine which programming language you will use for your custom integration.
Choose or pick a language where you are already know how to use or familiarize with.
2
Find a suitable API client or library for your chosen language.
Examples include:
- Python: Requests (http://docs.python-requests.org/)
- JavaScript: Axios (https://github.com/axios/axios)
- PHP: Guzzle (http://docs.guzzlephp.org/)
- Ruby: HTTParty (https://github.com/jnunemaker/httparty)
4
Authenticate your API calls

1
Use your Help Scout API key to authenticate your API calls.
This step is crucial to secure your API calls and allow Help Scout to identify your application. Please note that the API key should be kept secret. If it is exposed, others can make API calls on your behalf, potentially leading to unwanted changes or data exposure.
2
Add an "Authorization" header to your requests.
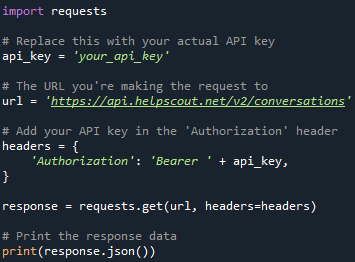
Now that you have your API key, you need to include it in your API calls to authenticate yourself. This is done by adding an "Authorization" header to your requests.
In this example, replace 'your-api-key' with the actual API key you generated in step 4.1. With the value "Bearer {API_KEY}", replacing "{API_KEY}" with your actual API key.
5
Build your custom integration

1
Define the API endpoints you will need for your custom integration.
To communicate with the Help Scout API, you need to define the API endpoints. These are URLs where your program can send a request. In our case, the endpoint to retrieve all conversations from a specific mailbox is:
https://api.helpscout.net/v2/mailboxes/{MAILBOX_ID}/conversations
Where {MAILBOX_ID} is the ID of the mailbox you are interested in. This ID can typically be found in the Help Scout web interface.
2
Write code to interact with these endpoints using your chosen programming language and API client.
Replace 'your_api_key_here' and 'your_mailbox_id_here' with your actual API key and mailbox ID. This script sends a GET request to the API, which should return a list of all conversations in the specified mailbox. In Python, you can use the requests library to interact with these endpoints. Here's an example:
import requests API_KEY = 'your_api_key_here' MAILBOX_ID = 'your_mailbox_id_here' ENDPOINT_URL = f'https://api.helpscout.net/v2/mailboxes/{MAILBOX_ID}/conversations' headers = {'Authorization': f'Bearer {API_KEY}'} response = requests.get(ENDPOINT_URL, headers=headers) if response.status_code == 200: conversations = response.json()['_embedded']['conversations'] print(conversations) else: print(f'Error: {response.status_code}')
3
Handle errors and edge cases, such as rate limiting and pagination.
Error handling is an important aspect of interacting with APIs. Here's how you can handle some common errors and edge cases:
Rate Limiting: Help Scout limits the number of requests you can make within a certain time period. If you exceed this limit, you'll receive a 429 status code. You can handle this by catching the exception and adding a delay before retrying.
Pagination: The Help Scout API uses pagination to limit the amount of data returned in a single response. You'll need to navigate through the pages to retrieve all data. This can be achieved by looking for the page property in the API response and sending additional requests as necessary.
6
Test your custom integration
1
Test your custom integration to ensure it works as expected.
Begin testing your integration in the test environment. Keep a detailed record of the test results. Note down any inconsistencies, errors, or unexpected behaviors. Since testing is complete, validate whether your integration has met the set objectives. If it has not, identify what changes need to be made.
2
Debug and troubleshoot any issues that arise.
Identify the Issue by identifying the issue, then review the code of your integration to see if there's anything that stands out as potentially problematic, and utilize debugging tools in your development environment to help identify any coding errors or operational issues.
Remember, the key to successful integration testing and troubleshooting is thorough preparation, systematic execution, and clear documentation.
Congratulations! You've successfully learned how to use Help Scout's API to create custom integrations. By leveraging the API, you can integrate Help Scout with other tools, automate tasks, and improve efficiency. Continuously explore the possibilities of custom integrations to optimize your support process and deliver exceptional customer experiences. Happy integrating!